It explains How to use different signs (+,> and ~) in CSS selector and their differences. Before starting, let us take a sample code to understand the signs.
<p>First</p> <div> <p>Child Paragraph</p> </div> <p>Second</p> <p>Third</p> </div>It is the descendant selector. It will target all p tags within container div.
> Sign:
It will target elements which are DIRECT children of a particular element.
|
1
2
3
|
div#container > p { border: 1px solid black;} |

It will target all P element which are direct children of container div, not children of child div.
+ Sign:
It is Adjacent sibling combinator. It combines two sequences of simple selectors having the same parent and the second one must come IMMEDIATELY after the first.
|
1
2
3
|
div + p { color: green; } |

It will only select the first element that is immediately preceded by the former selector. In our example, it will target to Second ONLY because the owner P element comes just after Div tag.
~ Sign:
It is general sibling combinator and similar to Adjacent sibling combinator. the difference is that the second selector does NOT have to immediately follow the first one means It will select all elements that is preceded by the former selector.
|
1
2
3
|
div ~ p{background-color:blue;} |

It will target both second and third.
@ Symbol in css:
These are all known in CSS as at-rules. They’re special instructions for the browser, not directly related to styling of (X)HTML/XML elements in Web documents using rules and properties, although they do play important roles in controlling how styles are applied.
/* Import another stylesheet from within a stylesheet */
@import url(style2.css);

/* Apply this style only for printing */
@media print {
    body {
        color: #000;
        background: #fff;
    }
}

/* Embed a custom web font */
@font-face {
    font-family: 'DejaVu Sans';
    src: local('DejaVu Sans Regular'), url(/fonts/DejaVuSans.ttf);
}@font-facerules define custom fonts for use in your designs that aren’t always available on all computers, so a browser downloads a font from the server and sets text in that custom font as if the user’s computer had the font.@mediarules, in conjunction with media queries (formerly only media types), control which styles are applied and which aren’t based on what media the page is being displayed in. In my code example, only when printing a document should all text be set in black against a white (the paper) background. You can use media queries to filter out print media, mobile devices and so on, and style pages differently for those.
At-rules have no relation to selectors whatsoever. Because of their varying nature, different at-rules are defined in different ways across numerous different modules. More examples include:
An example of @media that might be useful to illustrate it further:
@media screen and (max-width: 1440px)
{
    span.sizedImage
    {
        height:135px;
        width: 174px;
    }
}

@media screen and (min-width: 1441px)
{
    span.sizedImage
    {
        height:150px;
        width: 200px;
    }
}
This will vary the size of the image conditionally on the size of the screen, using a smaller image on a smaller screen. The first block would address screens up to width 1440px; the second would address screens larger than 1440px.
This comes in handy with things like tabs that float drop or scroll on smaller screens; you can often drop the font size of the tab labels down a point size on smaller screens and have them all fit.
So you learned the base id, class, and descendant selectors – and then called it a day? If so, you’re missing out on an enormous level of flexibility. While many of the selectors mentioned in this article are part of the CSS3 spec, and are, consequently, only available in modern browsers, you owe it to yourself to commit these to memory.
1. *
|
1
2
3
4
|
* { margin: 0; padding: 0;} |
Let’s knock the obvious ones out, for the beginners, before we move onto the more advanced selectors.
The star symbol will target every single element on the page. Many developers will use this trick to zero out the margins and padding. While this is certainly fine for quick tests, I’d advise you to never use this in production code. It adds too muchweight on the browser, and is unnecessary.
The * can also be used with child selectors.
|
1
2
3
|
#container * { border: 1px solid black;} |
This will target every single element that is a child of the #container div. Again, try not to use this technique very much, if ever.
View Demo
Compatibility
- IE6+
- Firefox
- Chrome
- Safari
- Opera
2. #X
|
1
2
3
4
|
#container { width: 960px; margin: auto;} |
Prefixing the hash symbol to a selector allows us to target by id. This is easily the most common usage, however be cautious when using id selectors.
Ask yourself: do I absolutely need to apply an id to this element in order to target it?
id selectors are rigid and don’t allow for reuse. If possible, first try to use a tag name, one of the new HTML5 elements, or even a pseudo-class.
View Demo
Compatibility
- IE6+
- Firefox
- Chrome
- Safari
- Opera
3. .X
|
1
2
3
|
.error { color: red;} |
This is a class selector. The difference between ids and classes is that, with the latter, you can target multiple elements. Use classes when you want your styling to apply to a group of elements. Alternatively, use ids to find a needle-in-a-haystack, and style only that specific element.
View Demo
Compatibility
- IE6+
- Firefox
- Chrome
- Safari
- Opera
4. X Y
|
1
2
3
|
li a { text-decoration: none;} |
The next most comment selector is the descendant selector. When you need to be more specific with your selectors, you use these. For example, what if, rather than targeting all anchor tags, you only need to target the anchors which are within an unordered list? This is specifically when you’d use a descendant selector.
Pro-tip – If your selector looks like X Y Z A B.error, you’re doing it wrong. Always ask yourself if it’s absolutely necessary to apply all of that weight.
View Demo
Compatibility
- IE6+
- Firefox
- Chrome
- Safari
- Opera
5. X
|
1
2
|
a { color: red; }ul { margin-left: 0; } |
What if you want to target all elements on a page, according to their type, rather than an id or classname? Keep it simple, and use a type selector. If you need to target all unordered lists, use ul {}.
View Demo
Compatibility
- IE6+
- Firefox
- Chrome
- Safari
- Opera
6. X:visited and X:link
|
1
2
|
a:link { color: red; }a:visted { color: purple; } |
We use the :link pseudo-class to target all anchors tags which have yet to be clicked on.
Alternatively, we also have the :visited pseudo class, which, as you’d expected, allows us to apply specific styling to only the anchor tags on the page which havebeen clicked on, or visited.
View Demo
Compatibility
- IE7+
- Firefox
- Chrome
- Safari
- Opera
7. X + Y
|
1
2
3
|
ul + p { color: red;} |
This is referred to as an adjacent selector. It will select only the element that is immediately preceded by the former element. In this case, only the first paragraph after each ul will have red text.
View Demo
Compatibility
- IE7+
- Firefox
- Chrome
- Safari
- Opera
8. X > Y
|
1
2
3
|
div#container > ul { border: 1px solid black;} |
The difference between the standard X Y and X > Y is that the latter will only select direct children. For example, consider the following markup.
|
01
02
03
04
05
06
07
08
09
10
11
12
|
<div id="container"> <ul> <li> List Item <ul> <li> Child </li> </ul> </li> <li> List Item </li> <li> List Item </li> <li> List Item </li> </ul></div> |
A selector of #container > ul will only target the uls which are direct children of the div with an id of container. It will not target, for instance, the ul that is a child of the first li.
For this reason, there are performance benefits in using the child combinator. In fact, it’s recommended particularly when working with JavaScript-based CSS selector engines.
View Demo
Compatibility
- IE7+
- Firefox
- Chrome
- Safari
- Opera
9. X ~ Y
|
1
2
3
|
ul ~ p { color: red;} |
This sibling combinator is similar to X + Y, however, it’s less strict. While an adjacent selector (ul + p) will only select the first element that is immediatelypreceded by the former selector, this one is more generalized. It will select, referring to our example above, any p elements, as long as they follow a ul.
View Demo
Compatibility
- IE7+
- Firefox
- Chrome
- Safari
- Opera
10. X[title]
|
1
2
3
|
a[title] { color: green;} |
Referred to as an attributes selector, in our example above, this will only select the anchor tags that have a title attribute. Anchor tags which do not will not receive this particular styling. But, what if you need to be more specific? Well…
View Demo
Compatibility
- IE7+
- Firefox
- Chrome
- Safari
- Opera
11. X[href=”foo”]
|
1
2
3
|
color: #1f6053; /* nettuts green */} |
The snippet above will style all anchor tags which link to http://net.tutsplus.com; they’ll receive our branded green color. All other anchor tags will remain unaffected.
Note that we’re wrapping the value in quotes. Remember to also do this when using a JavaScript CSS selector engine. When possible, always use CSS3 selectors over unofficial methods.
This works well, though, it’s a bit rigid. What if the link does indeed direct to Nettuts+, but, maybe, the path is nettuts.com rather than the full url? In those cases we can use a bit of the regular expressions syntax.
View Demo
Compatibility
- IE7+
- Firefox
- Chrome
- Safari
- Opera
12. X[href*=”nettuts”]
|
1
2
3
|
a[href*="tuts"] { color: #1f6053; /* nettuts green */} |
There we go; that’s what we need. The star designates that the proceeding value must appear somewhere in the attribute’s value. That way, this covers nettuts.com,net.tutsplus.com, and even tutsplus.com.
Keep in mind that this is a broad statement. What if the anchor tag linked to some non-Envato site with the string tuts in the url? When you need to be more specific, use ^ and &, to reference the beginning and end of a string, respectively.
View Demo
Compatibility
- IE7+
- Firefox
- Chrome
- Safari
- Opera
13. X[href^=”http”]
|
1
2
3
4
|
a[href^="http"] { background: url(path/to/external/<span class="skimlinks-unlinked">icon.png</span>) no-repeat; padding-left: 10px;} |
Ever wonder how some websites are able to display a little icon next to the links which are external? I’m sure you’ve seen these before; they’re nice reminders that the link will direct you to an entirely different website.
This is a cinch with the carat symbol. It’s most commonly used in regular expressions to designate the beginning of a string. If we want to target all anchor tags that have a href which begins with http, we could use a selector similar to the snippet shown above.
Notice that we’re not searching for http://; that’s unnecessary, and doesn’t account for the urls that begin with https://.
Now, what if we wanted to instead style all anchors which link to, say, a photo? In those cases, let’s search for the end of the string.
View Demo
Compatibility
- IE7+
- Firefox
- Chrome
- Safari
- Opera
14. X[href$=”.jpg”]
|
1
2
3
|
a[href$=".jpg"] { color: red;} |
Again, we use a regular expressions symbol, $, to refer to the end of a string. In this case, we’re searching for all anchors which link to an image — or at least a url that ends with .jpg. Keep in mind that this certainly won’t work for gifs and pngs.
View Demo
Compatibility
- IE7+
- Firefox
- Chrome
- Safari
- Opera
15. X[data-*=”foo”]
|
1
2
3
|
a[data-filetype="image"] { color: red;} |
Refer back to number eight; how do we compensate for all of the various image types: png, jpeg,jpg, gif? Well, we could create multiple selectors, such as:
|
1
2
3
4
5
6
|
a[href$=".jpg"],a[href$=".jpeg"],a[href$=".png"],a[href$=".gif"] { color: red;} |
But, that’s a pain in the butt, and is inefficient. Another possible solution is to use custom attributes. What if we added our own data-filetype attribute to each anchor that links to an image?
|
1
|
<a href="path/to/image.jpg" data-filetype="image"> Image Link </a> |
Then, with that hook in place, we can use a standard attributes selector to target only those anchors.
|
1
2
3
|
a[data-filetype="image"] { color: red;} |
View Demo
Compatibility
- IE7+
- Firefox
- Chrome
- Safari
- Opera
16. X[foo~=”bar”]
|
1
2
3
4
5
6
7
|
a[data-info~="external"] { color: red;}a[data-info~="image"] { border: 1px solid black;} |
Here’s a special one that’ll impress your friends. Not too many people know about this trick. The tilda (~) symbol allows us to target an attribute which has a spaced-separated list of values.
Going along with our custom attribute from number fifteen, above, we could create adata-info attribute, which can receive a space-separated list of anything we need to make note of. In this case, we’ll make note of external links and links to images — just for the example.
|
1
|
"<a href="path/to/<span class="skimlinks-unlinked">image.jpg</span>" data-info="external image"> Click Me, Fool </a> |
With that markup in place, now we can target any tags that have either of those values, by using the ~ attributes selector trick.
|
1
2
3
4
5
6
7
8
9
|
/* Target data-info attr that contains the value "external" */a[data-info~="external"] { color: red;}/* And which contain the value "image" */a[data-info~="image"] { border: 1px solid black;} |
Pretty nifty, ay?
View Demo
Compatibility
- IE7+
- Firefox
- Chrome
- Safari
- Opera
17. X:checked
|
1
2
3
|
input[type=radio]:checked { border: 1px solid black;} |
This pseudo class will only target a user interface element that has been checked – like a radio button, or checkbox. It’s as simple as that.
View Demo
Compatibility
- IE9+
- Firefox
- Chrome
- Safari
- Opera
18. X:after
The before and after pseudo classes kick butt. Every day, it seems, people are finding new and creative ways to use them effectively. They simply generate content around the selected element.
Many were first introduced to these classes when they encountered the clear-fix hack.
|
01
02
03
04
05
06
07
08
09
10
11
12
13
|
.clearfix:after { content: ""; display: block; clear: both; visibility: hidden; font-size: 0; height: 0; }.clearfix { *display: inline-block; _height: 1%;} |
This hack uses the :after pseudo class to append a space after the element, and then clear it. It’s an excellent trick to have in your tool bag, particularly in the cases when the overflow: hidden; method isn’t possible.
For another creative use of this, refer to my quick tip on creating shadows.
According to the CSS3 Selectors specification, you should technically use the pseudo element syntax of two colons ::. However, to remain compatible, the user-agent will accept a single colon usage as well. In fact, at this point, it’s smarter to use the single-colon version in your projects.
Compatibility
- IE8+
- Firefox
- Chrome
- Safari
- Opera
19. X:hover
|
1
2
3
|
div:hover { background: #e3e3e3;} |
Oh come on. You know this one. The official term for this is user action pseudo class. It sounds confusing, but it really isn’t. Want to apply specific styling when a user hovers over an element? This will get the job done!
Keep in mind that older version of Internet Explorer don’t respond when the :hover pseudo class is applied to anything other than an anchor tag.
You’ll most often use this selector when applying, for example, a border-bottom to anchor tags, when hovered over.
|
1
2
3
|
a:hover { border-bottom: 1px solid black;} |
Pro-tip – border-bottom: 1px solid black; looks better thantext-decoration: underline;.
Compatibility
- IE6+ (In IE6, :hover must be applied to an anchor element)
- Firefox
- Chrome
- Safari
- Opera
20. X:not(selector)
|
1
2
3
|
div:not(#container) { color: blue;} |
The negation pseudo class is particularly helpful. Let’s say I want to select all divs, except for the one which has an id of container. The snippet above will handle that task perfectly.
Or, if I wanted to select every single element (not advised) except for paragraph tags, we could do:
|
1
2
3
|
*:not(p) { color: green;} |
View Demo
Compatibility
- IE9+
- Firefox
- Chrome
- Safari
- Opera
21. X::pseudoElement
|
1
2
3
4
|
p::first-line { font-weight: bold; font-size: 1.2em;} |
We can use pseudo elements (designated by ::) to style fragments of an element, such as the first line, or the first letter. Keep in mind that these must be applied to block level elements in order to take effect.
A pseudo-element is composed of two colons: ::
Target the First Letter of a Paragraph
|
1
2
3
4
5
6
7
|
p::first-letter { float: left; font-size: 2em; font-weight: bold; font-family: cursive; padding-right: 2px;} |
This snippet is an abstraction that will find all paragraphs on the page, and then sub-target only the first letter of that element.
This is most often used to create newspaper-like styling for the first-letter of an article.
Target the First Line of a Paragraph
|
1
2
3
4
|
p::first-line { font-weight: bold; font-size: 1.2em;} |
Similarly, the ::first-line pseudo element will, as expected, style the first line of the element only.
“For compatibility with existing style sheets, user agents must also accept the previous one-colon notation for pseudo-elements introduced in CSS levels 1 and 2 (namely, :first-line, :first-letter, :before and :after). This compatibility is not allowed for the new pseudo-elements introduced in this specification.” – Source
View Demo
Compatibility
- IE6+
- Firefox
- Chrome
- Safari
- Opera
22. X:nth-child(n)
|
1
2
3
|
li:nth-child(3) { color: red;} |
Remember the days when we had no way to target specific elements in a stack? The nth-child pseudo class solves that!
Please note that nth-child accepts an integer as a parameter, however, this is not zero-based. If you wish to target the second list item, use li:nth-child(2).
We can even use this to select a variable set of children. For example, we could doli:nth-child(4n) to select every fourth list item.
View Demo
Compatibility
- IE9+
- Firefox 3.5+
- Chrome
- Safari
23. X:nth-last-child(n)
|
1
2
3
|
li:nth-last-child(2) { color: red;} |
What if you had a huge list of items in a ul, and only needed to access, say, the third to the last item? Rather than doing li:nth-child(397), you could instead use the nth-last-child pseudo class.
This technique works almost identically from number sixteen above, however, the difference is that it begins at the end of the collection, and works its way back.
View Demo
Compatibility
- IE9+
- Firefox 3.5+
- Chrome
- Safari
- Opera
24. X:nth-of-type(n)
|
1
2
3
|
ul:nth-of-type(3) { border: 1px solid black;} |
There will be times when, rather than selecting a child, you instead need to select according to the type of element.
Imagine mark-up that contains five unordered lists. If you wanted to style only the third ul, and didn’t have a unique id to hook into, you could use the nth-of-type(n) pseudo class. In the snippet above, only the third ul will have a border around it.
View Demo
Compatibility
- IE9+
- Firefox 3.5+
- Chrome
- Safari
25. X:nth-last-of-type(n)
|
1
2
3
|
ul:nth-last-of-type(3) { border: 1px solid black;} |
And yes, to remain consistent, we can also use nth-last-of-type to begin at the end of the selectors list, and work our way back to target the desired element.
Compatibility
- IE9+
- Firefox 3.5+
- Chrome
- Safari
- Opera
26. X:first-child
|
1
2
3
|
ul li:first-child { border-top: none;} |
This structural pseudo class allows us to target only the first child of the element’s parent. You’ll often use this to remove borders from the first and last list items.
For example, let’s say you have a list of rows, and each one has a border-top and a border-bottom. Well, with that arrangement, the first and last item in that set will look a bit odd.
Many designers apply classes of first and last to compensate for this. Instead, you can use these pseudo classes.
View Demo
Compatibility
- IE7+
- Firefox
- Chrome
- Safari
- Opera
27. X:last-child
|
1
2
3
|
ul > li:last-child { color: green;} |
The opposite of first-child, last-child will target the last item of the element’s parent.
Example
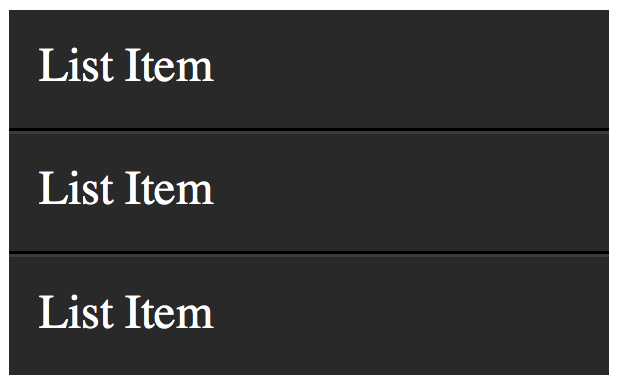
Let’s build a simple example to demonstrate one possible use of these classes. We’ll create a styled list item.
Markup
|
1
2
3
4
5
|
<ul> <li> List Item </li> <li> List Item </li> <li> List Item </li></ul> |
Nothing special here; just a simple list.
CSS
|
01
02
03
04
05
06
07
08
09
10
11
12
13
|
ul { width: 200px; background: #292929; color: white; list-style: none; padding-left: 0;}li { padding: 10px; border-bottom: 1px solid black; border-top: 1px solid #3c3c3c;} |
This styling will set a background, remove the browser-default padding on the ul, and apply borders to each li to provide a bit of depth.

To add depth to your lists, apply a border-bottom to eachli that is a shade or two darker than the li‘s background color. Next, apply a border-top which is a couple shades lighter.
The only problem, as shown in the image above, is that a border will be applied to the very top and bottom of the unordered list – which looks odd. Let’s use the:first-child and :last-child pseudo classes to fix this.
|
1
2
3
4
5
6
7
|
li:first-child { border-top: none;}li:last-child { border-bottom: none;} |
There we go; that fixes it!
View Demo
Compatibility
- IE9+
- Firefox
- Chrome
- Safari
- Opera
Yep – IE8 supported :first-child, but not :last-child. Go figure.
28. X:only-child
|
1
2
3
|
div p:only-child { color: red;} |
Truthfully, you probably won’t find yourself using the only-child pseudo class too often. Nonetheless, it’s available, should you need it.
It allows you to target elements which are the only child of its parent. For example, referencing the snippet above, only the paragraph that is the only child of the divwill be colored, red.
Let’s assume the following markup.
|
1
2
3
4
5
6
|
<div><p> My paragraph here. </p></div><div> <p> Two paragraphs total. </p> <p> Two paragraphs total. </p></div> |
In this case, the second div‘s paragraphs will not be targeted; only the first div. As soon as you apply more than one child to an element, the only-child pseudo class ceases to take effect.
View Demo
Compatibility
- IE9+
- Firefox
- Chrome
- Safari
- Opera
29. X:only-of-type
|
1
2
3
|
li:only-of-type { font-weight: bold;} |
This structural pseudo class can be used in some clever ways. It will target elements that do not have any siblings within its parent container. As an example, let’s target all uls, which have only a single list item.
First, ask yourself how you would accomplish this task? You could do ul li, but, this would target all list items. The only solution is to use only-of-type.
|
1
2
3
|
ul > li:only-of-type { font-weight: bold;} |
View Demo
Compatibility
- IE9+
- Firefox 3.5+
- Chrome
- Safari
- Opera
30. X:first-of-type
The first-of-type pseudo class allows you to select the first siblings of its type.
A Test
To better understand this, let’s have a test. Copy the following mark-up into your code editor:
|
01
02
03
04
05
06
07
08
09
10
11
12
|
<div> <p> My paragraph here. </p> <ul> <li> List Item 1 </li> <li> List Item 2 </li> </ul> <ul> <li> List Item 3 </li> <li> List Item 4 </li> </ul> </div> |
Now, without reading further, try to figure out how to target only “List Item 2”. When you’ve figured it out (or given up), read on.
Solution 1
There are a variety of ways to solve this test. We’ll review a handful of them. Let’s begin by using first-of-type.
|
1
2
3
|
ul:first-of-type > li:nth-child(2) { font-weight: bold;} |
This snippet essentially says, “find the first unordered list on the page, then find only the immediate children, which are list items. Next, filter that down to only the second list item in that set.
Solution 2
Another option is to use the adjacent selector.
|
1
2
3
|
p + ul li:last-child { font-weight: bold;} |
In this scenario, we find the ul that immediately proceeds the p tag, and then find the very last child of the element.
Solution 3
We can be as obnoxious or as playful as we want with these selectors.
|
1
2
3
|
ul:first-of-type li:nth-last-child(1) { font-weight: bold; } |
This time, we grab the first ul on the page, and then find the very first list item, but starting from the bottom! 🙂
View Demo
Hope, you enjoyed this.
Source Credits:
http://techbrij.com/css-selector-adjacent-child-sibling
Stackoverflow.com
http://code.tutsplus.com/tutorials/the-30-css-selectors-you-must-memorize–net-16048
